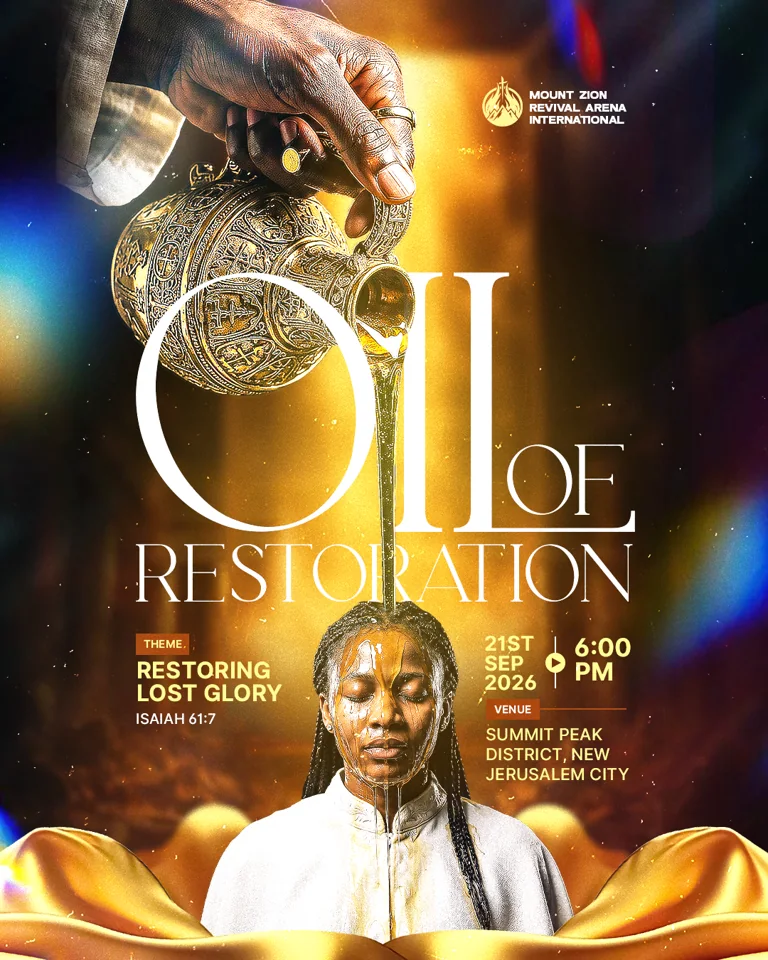
In this tutorial you will design a church event flyer, "Oil of Restoration", in Adobe Photoshop. A hand pours oil from an ornate jug onto a woman's head while golden light falls from above, and a tall, elegant title wraps around the jug.
You will build a glowing background from several light images, frame the subject with mirrored gold fabric, tuck the jug in front of the title with a simple selection trick, and finish with a warm glow and texture. Each step links to the exact moment in the video, so press Watch at whenever you want to see it done.
What you will make
What you need
- Adobe Photoshop
- The resource pack: the light and temple images, the woman, the gold fabric, the hand with the jug, the textures and the serif font
- About 25 minutes
- Install the font before you open Photoshop so it appears in the font list
Get the resource pack from our Telegram channel before you start.
Create a new document at 1080 × 1350 px, 300 ppi, RGB, 8 bit, and click Create.
Add a Solid Color fill layer from the adjustment icon at the bottom of the Layers panel and make it black. If the Properties panel is closed, open it from Window › Properties to change the color. A black base makes every light you add later glow.


Drag the golden doorway image from the resource folder onto the canvas. Scale it up so the bottom sits on the bottom edge and the light beam runs through the middle.
Add a layer mask, take a big soft black brush with a low flow (around 39%) and paint away the dark door frames on the left and right, so only the column of light remains.
Click the image thumbnail (not the mask), go to Filter › Blur › Gaussian Blur and set about 9.5 px. The light becomes soft and dreamy. If you hid too much, paint with white on the mask to bring some back.
Tip: Always check which thumbnail is selected. Filters on the mask thumbnail blur the mask, not the image.


Bring in the stage spotlight image and scale it to fill the canvas. Change its blend mode to Soft Light, then apply Gaussian Blur at 10 px.
Soft Light only adds its warm colors and contrast to the layers below, so the beam gets richer without showing the stage itself.

Bring in the golden temple image, scale it to fill the width and push it down a little.
Add a layer mask and use a Soft Round brush (right-click, General Brushes) with a low flow, around 17%. Paint away the sky and the middle so only the bottom of the temple stays. Then select the image thumbnail and add a Gaussian Blur of 4.5 px so it sits behind the subject.


Drag in the woman receiving the oil. She is already cut out. Scale her down and centre her at the bottom of the canvas, right under the beam of light, so the light seems to fall on her.

Bring in the gold fabric image, place it at the bottom right and rotate it about 35°. Hold Alt and drag to the left to make a copy, press Ctrl+T, right-click and choose Flip Horizontal.
Select the layer just below the woman and bring in the fabric again. Right-click, choose Flip Vertical, drag it down and rotate it slightly. If a tip pokes out where you do not want it, add a mask and paint it away in black. Duplicate and flip it horizontally for the other side.
Finally blur the two back pieces with Gaussian Blur at 4 px. The fabric in front stays sharp, the fabric behind stays soft, and that difference creates depth.
Tip: Blur only the pieces behind the subject. Sharp in front, soft behind is the quickest way to fake depth.


Select the woman and add a Brightness/Contrast adjustment. Set the Brightness to 40, then right-click the adjustment and choose Create Clipping Mask so it only brightens her. She now matches the bright light above.

Select the top layer and bring in the hand with the jug. Right-click and choose Flip Horizontal, then place it at the top so the stream of oil lands on her head. Scale it up a little.
Add a layer mask and paint away anything that crosses over the parts below. Then add a mask to the woman's layer and paint gently at the top of her head with a low flow, so the oil stream blends into her hair.
Add another Brightness/Contrast layer at 60 and clip it to the hand.


Press T, click and type OIL in capitals. Open Window › Character, choose the thin serif font from the resource pack (called Avilene in the video) and set the size to 125 pt, in white.
Go to View › Guides › New Guide Layout, tick Margin and enter Top 110 px, Left 190 px, Bottom 250 px, Right 190 px. Scale the word with Ctrl+T so the long stem of the L touches the right guide, then move it down a little so the stream of oil runs through the letters.


Here is the trick that makes the title wrap around the jug. Hold Ctrl and click the thumbnail of the hand layer. This loads a selection around the hand and jug.
Select the OIL text layer. Go to Select › Inverse (Shift+Ctrl+I) and then click Add layer mask. The text disappears only where the jug is, so the jug now sits in front of the O.
Take a white brush at 100% flow and paint back the parts of the letters that should stay in front, like the right side of the O. That is what makes it look like the O goes around the jug.
Tip: If the whole word disappears when you add the mask, you forgot to inverse the selection. Undo with Ctrl+Z, press Shift+Ctrl+I and add the mask again.


Lock the OIL layer first, using the padlock in the Layers panel. It is so big that you would keep clicking on it when you try to type.
Type RESTORATION in the same font, place it under OIL and scale it until it fills the width between the left and right guides.
The video does the next part without comment: type a small OF in the same font and tuck it into the space next to the L, sitting on top of RESTORATION. The three words now read as one lockup.
Tip: Lock big layers you have finished. It stops you from selecting or moving them by accident.


Create a new empty layer and set its blend mode to Linear Dodge (Add). Set the color to #FACA2E.
Take a large soft brush, lower the flow to about 22% and dab around the title and the stream of oil. Each click adds a soft golden glow. Toggle the layer on and off to compare before and after.

Bring in the texture image and set its blend mode to Color Dodge. Duplicate it for a stronger noisy effect, or lower the opacity of the top copy until it looks right to you. Lock both layers.
The vintage dust image is optional: set it to Screen if you want extra specks of light.

Add the church logo and name in the top right corner, inside the guides.
Under the title, on the left, add the theme: a small label THEME on an orange box, then RESTORING LOST GLORY in yellow and the scripture reference. On the right, add the date and time (21ST SEP 2026 with a play-style divider and 6:00 PM), then a VENUE label and the address.
In the video these details appear all at once because they were prepared earlier. In the final flyer, colored light leaks were also added on the left and right edges with the Screen blend mode, a last touch that does not appear in the video.

Key takeaways
- Start on black and stack several light images: a masked doorway, a spotlight on Soft Light and a blurred temple.
- Mirror one piece of gold fabric in front and behind the subject, and blur only the back pieces for depth.
- Clip Brightness/Contrast layers to the woman and the hand so they match the light around them.
- Ctrl+click a layer thumbnail, inverse the selection and mask the text to make a title wrap around an object.
- Finish with a Linear Dodge glow (#FACA2E), a Color Dodge texture and the event details on guides.