
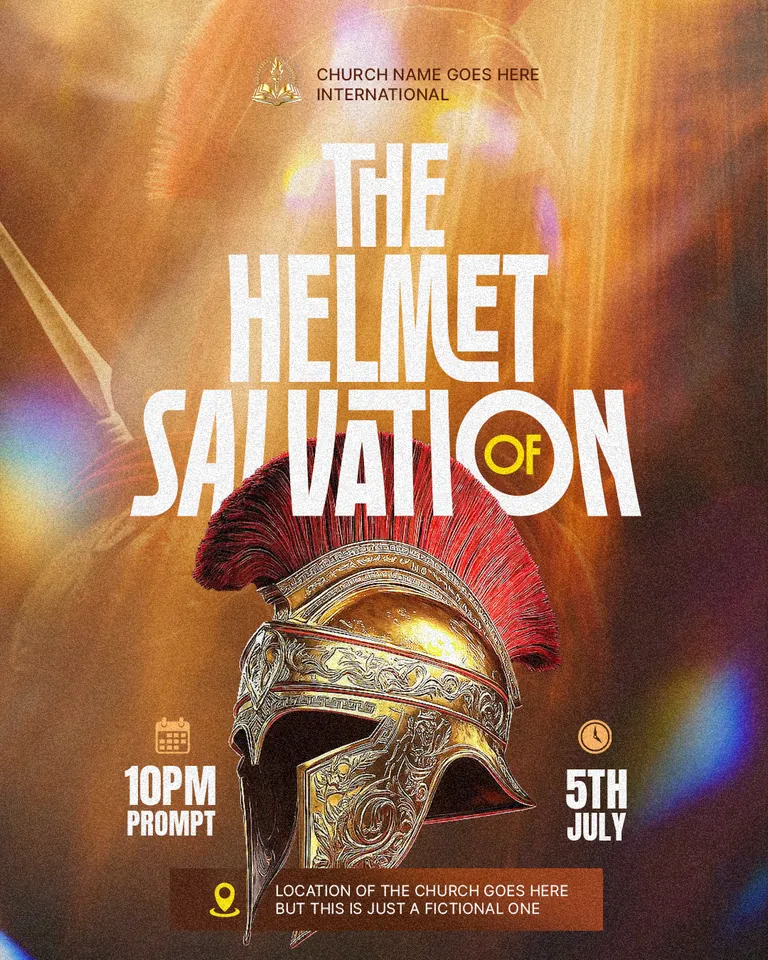
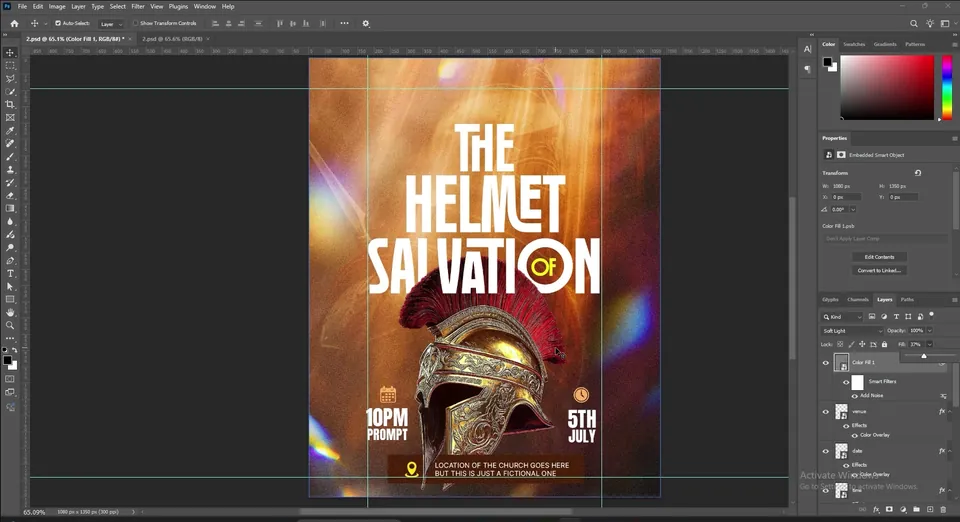
In this tutorial you will design a church flyer, "The Helmet of Salvation", in Adobe Photoshop. A golden Spartan helmet breaks through a bold white title on a warm, glowing orange background, a clear picture of Ephesians 6:17.
You will learn how to blend a second photo softly into a background, set up a margin guide layout, build a stacked title in Robinco, make an object sit both in front of and behind text with one layer mask, and finish with a highlighted info bar, light leaks and noise. Each step links to the exact moment in the video, so press Watch at whenever you want to see it done.
What you will make
What you need
- Adobe Photoshop
- The resource pack: the orange light background, the warrior photo, the cut-out helmet, the icons and the rainbow light leak
- The Robinco font
- About 15 minutes
Get the resource pack from our Telegram channel before you start.
Open Photoshop and create a new document of 1080 × 1350 px. This portrait size fits Instagram, Facebook and WhatsApp status without cropping. Click Create.

Drag the orange light image from the resource folder onto the canvas and scale it up to fill the whole page.
This background is already smooth and soft, so you do not need a Radial Blur or Gaussian Blur on it. You will only blend one more image into it.

Drag in the warrior photo and scale it up. Place it where you like, for example higher up so the helmet sits in the upper half.
Change its blend mode to Soft Light (or Overlay). Do not use Screen or Color Dodge, because they wash it out. Then lower the Fill a little, so the warrior shows as a faint shape inside the orange light.
Tip: Soft Light and Overlay keep the background colours and only add shape. Screen and Color Dodge brighten too much and wash the photo out.


Add a layer mask to the warrior. Take the brush with black as the foreground colour and the flow at about 30%.
Wipe away most of the lower part of the warrior, then click once or twice in other places to fade it more. Keep only a hint of it. If it fights with the title later, you can come back and paint more away.

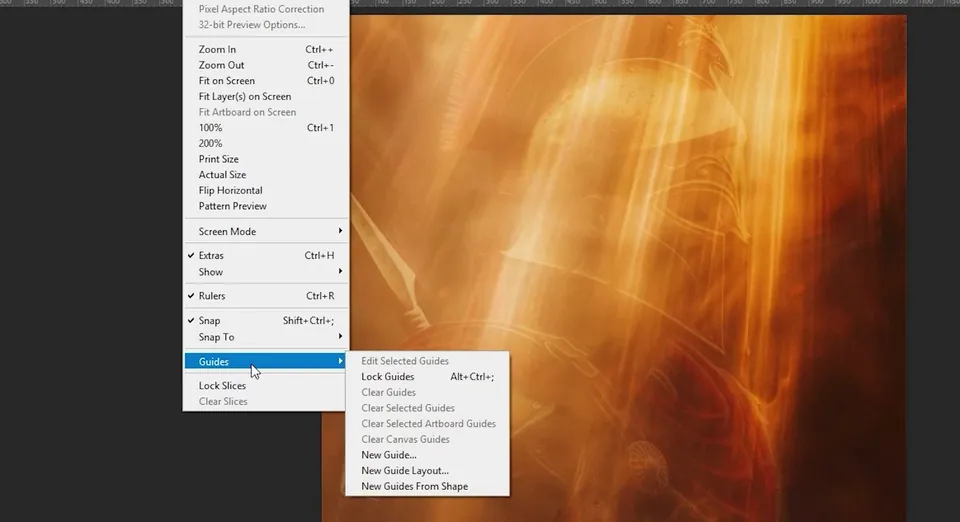
Go to View › Guides › New Guide Layout. (In some versions it sits directly in the View menu as New Guide Layout.)
Tick Margin and enter Top 95 px, Left 180 px, Bottom 60 px and Right 180 px, then click OK. The wide side margins keep the title narrow and tall.

Pick the Type tool with T and type THE, HELMET and SALVATION on three lines. The full title is "The Helmet of Salvation", but leave out "OF" for now: it gets a special place later.
Set the font to Robinco in white, turn on All Caps and tighten the leading so the lines sit close. If you cannot see the Character panel, open it from Window › Character.
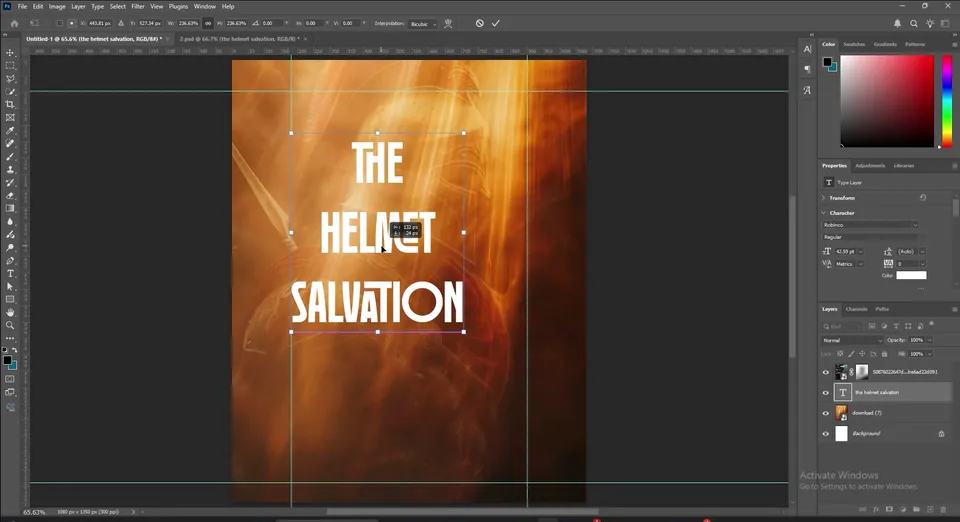

Make the words different sizes so the title has rhythm. Select THE and make it smaller (about 50 pt). Select HELMET and set it to about 60 pt, and let SALVATION stretch between the guides.
Adjust the leading again until the lines nearly touch.


Robinco's O is a ring, which leaves a perfect empty circle in SALVATION. Type OF as a separate text layer, make it small and place it right inside that O. Zoom in to centre it carefully.
Change its colour to a warm yellow so it stands out from the white letters. Then move the whole title down a little to leave space for the church logo at the top.
Tip: Look for letters with open shapes, like a ring-shaped O, to hold a small word. It saves space and looks designed.


Drag the cut-out helmet from the resource folder and scale it up. Place it low in the middle, so the red crest pushes up into the letters of SALVATION.
Let the crest cover part of the word: that overlap is what the next steps are about.

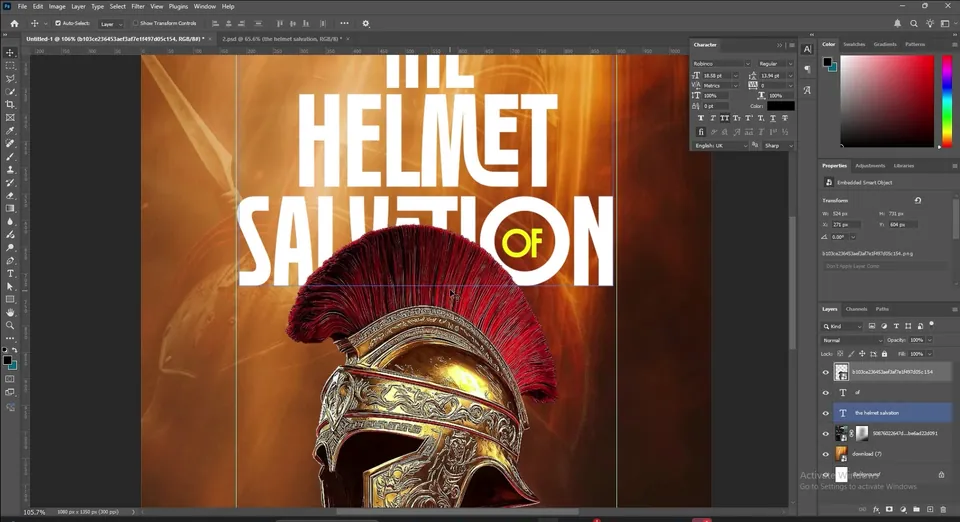
Hold Ctrl and click the T thumbnail of the title layer in the Layers panel. This makes a selection in the shape of the letters.
Select the helmet layer. If you add a mask now, the helmet only shows inside the letters, which is the opposite of what you want. So first go to Select › Inverse (Shift+Ctrl+I), then click Add layer mask. Now the helmet disappears wherever there are letters, so the whole title sits in front of it.
Tip: Do not undo the selection if you add the mask the wrong way round. Undo only the mask, invert the selection, and add the mask again.
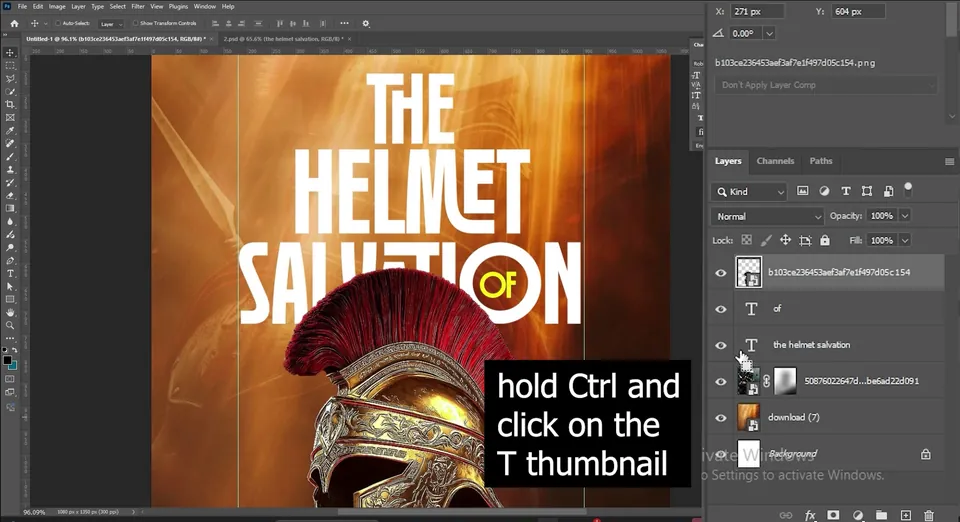

The mask is already selected. Pick the Brush tool, right-click the canvas and choose the Hard Round brush under General Brushes. Set Flow and Opacity to 100% and the foreground colour to white.
Paint over the crest where it crosses the letters. Wherever you paint, the helmet comes back in front of the title. Choose which letters to cover: for example bring it over only the middle of SALVATION and leave the sides behind. The helmet now feels like it is bursting through the words.
Tip: If you bring back too much of the helmet, switch to black and paint it away again.


Pick the Rectangle tool and draw a bar near the bottom, where the location will go. Double-click its thumbnail and choose a dark brown.
Create a new layer above it, right-click and choose Create Clipping Mask. Take the brush, hold Alt and click the rectangle to sample its colour, then pick a lighter shade. Right-click and switch to a Soft Round brush, make it big, lower the flow and brush the sides to add soft highlights.
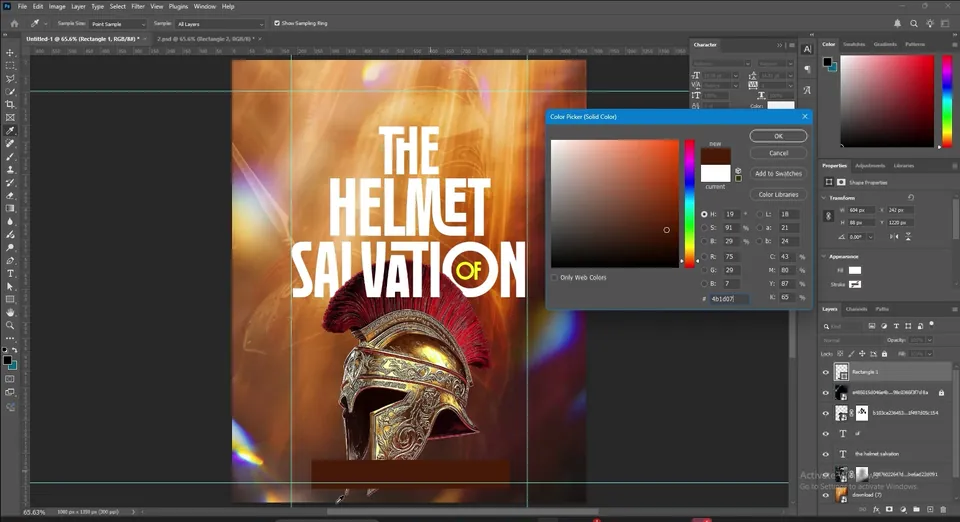

The bar sits on top of the bottom of the helmet. Use the same trick as before: select the helmet layer and hold Ctrl as you click its thumbnail to select the helmet's shape.
Select the rectangle layer, go to Select › Inverse and click Add layer mask. With the Hard Round brush at 100% and white, paint over one part of the bar to bring it back in front, and leave the other side so the chin of the helmet stays on top.
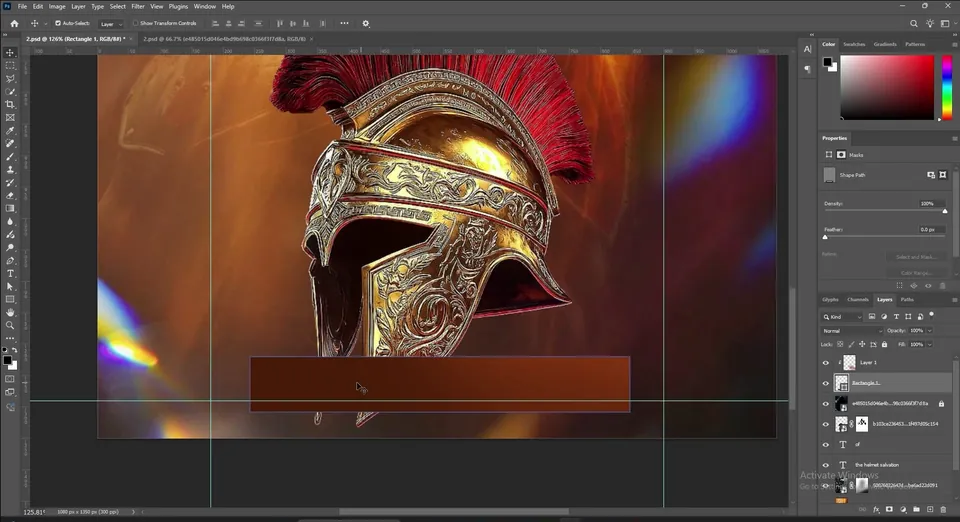

Now add the typography. The video skips it, but you can see it on screen: the church logo at the top, 10PM PROMPT on the left and 5TH JULY on the right of the helmet, each with a small icon, and the location on the brown bar with a pin icon. The icons are in the resources.
A rainbow light leak was also added off camera (the video says so on screen). Place it on top and set it to Screen so the colourful streaks appear on the edges.

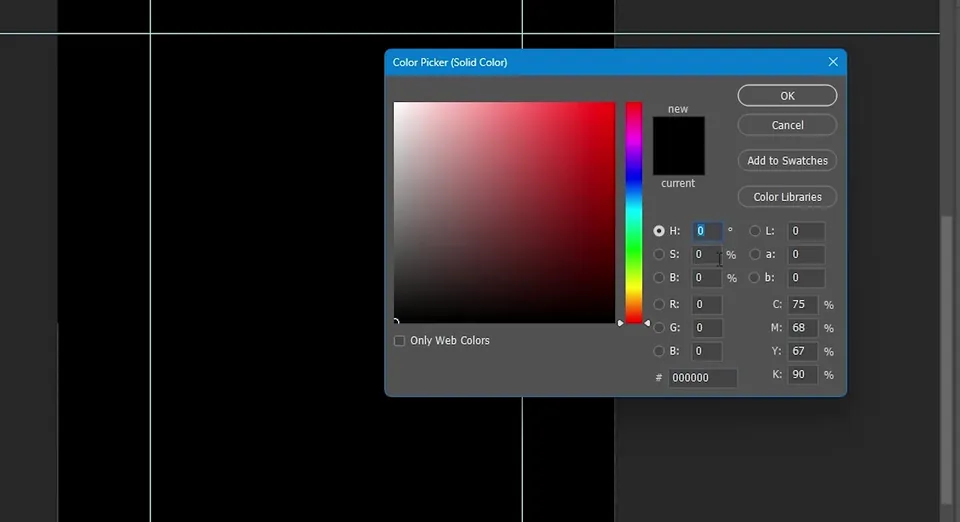
Select the top layer and add a Solid Color fill layer with H 0, S 0, B 50. Go to Filter › Noise › Add Noise. When Photoshop asks, click Convert To Smart Object. Set the amount to about 52%, choose Gaussian and tick Monochromatic.
Set the blend mode to Hard Light and lower the Fill until the grain is subtle. For a smoother look, use Soft Light instead.
Tip: If the noise feels too strong, lower the Fill rather than the Opacity.

Key takeaways
- A second photo on Soft Light with a soft mask adds a hidden shape to a plain background.
- Wide side margins in a guide layout make a tall, narrow title.
- Ctrl-click a layer thumbnail to load its shape, invert the selection and add a mask to put an object behind it.
- Paint white on that mask with a hard brush to bring parts of the object back in front.
- Finish with a clipped highlight bar, a light leak on Screen and noise on Hard Light or Soft Light.


